In previous post, we performed general integration of MoSKito into the target project.
In today’s step (rather short), we’re going to add some business-value-related information with a Counter.
Counters are a great way of counting stuff.
Well, you probably didn’t expect so much wisdom at the beginning of the post, so I’ll try to rephrase.
Counters are good to count or monitor producers that are less technical.
A typical Monitored producer will generate statistics, like request duration or average error count. Those are great to monitor a web service.
But what if you simply count the orders in your web-shop? Then you’re not interested in average duration or error count whatsoever, because you don’t have or don’t need this technical info. Instead, you have the burger-order-count.
So, that’s what we are going today – count the burgers we sell.
Since we have been using AOP integration in our last step, we will also use it for counters. There is a detailed post about counters in this blog, see it for more info. To add an AOP Style Counter, we need a class, which, well, simply has a method we can call.
I. Adding a Counter
So now lets add the Counter:
package de.zaunberg.burgershop.service;

import net.anotheria.moskito.aop.annotation.Count;

@Count
public class OrderCounter {
	public void orderPlaced(){}

}
That’s all, a class annotated @Count and a method to call. Every call to any method of the class will be counted.
Now we have to add the actual counting. The ShopServiceImpl is the location where an Order is actually generated. Therefore, it’s also a good place to count orders.
To count an order, we need an instance of the counter and a call to the order placed method, let’s add both.
First, we need to have a variable we can call:
@Monitor
public class ShopServiceImpl implements ShopService {
  private LinkedList<ShopableItem> items;
  private static Logger log = LoggerFactory.getLogger(ShopServiceImpl.class);
  //add the counter.
  private OrderCounter counter = new OrderCounter();
...
and now the call itself:
@Override
public Order placeOrder(String... items) {
  ...
  counter.orderPlaced();
  return order;
}
Now, let’s build the shop with mvn install and check what we have achieved.
Click the link below to place a ready order (feel free to place the order in a normal way, though):
http://localhost:8080/burgershop/order.html?choice1=wheat&choice2=pork&choice3=cheese
This creates a new order. If we take a look at our MoSKito-WebUI now (http://localhost:8080/burgershop/mui/mskShowAllProducers), we’ll see we’ve got a new producer called OrderCounter, within Counter Decorator:
 If we click it:
 we’ll see that 1 order has been placed.
If we add further methods to the counter class, we can monitor other business values, such as userRegistered, userLoggedIn, paymentReceived and so on. And all of this, just by simply calling a method in a annotated class!
II. Counting by Parameter
But Counters can do more. Let’s assume we need to monitor the ingredients of our burgers, and we need to know how much of which ingredient we are selling, so we can order more.
To do so, we add another Counter class to our project, the IngredientCounter:
package de.zaunberg.burgershop.service;

import net.anotheria.moskito.aop.annotation.CountByParameter;

public class IngredientCounter {
  @CountByParameter public void ingredientUsed(String ingredient){

  }
}
You surely noticed the 2 differences with the previous Counter:
1. We haven’t annotated the class, but the method only.
2. We used @CountByParameter instead of @Count.
Since we have multiple ingredients, it wouldn’t be very convenient to use the standard @Count annotation, because we would need to add a method for each ingredient. This wouldn’t look elegant at all.
@Count uses the name of the called method as a use-case name (stat name). @CountByParameter uses the first parameter to the method instead. This is much more handy if the stat names are variables that we don’t know when creating the application.
We now add a new counter to the ShopServiceImpl:
@Monitor
public class ShopServiceImpl implements ShopService {

  ...
  private OrderCounter counter = new OrderCounter();
  private IngredientCounter ingredientCounter = new IngredientCounter();

  @Override
  public Order placeOrder(String... items) {
    ...
    Order order = new Order();
    for (String item : items){
      order.addItem(findItemByName(item));
      ingredientCounter.ingredientUsed(item);
    }

    counter.orderPlaced();

    return order;
  }
  ...
}
Let’s build again, restart and place an order.
Now we see two Counters in the Counter decorator section:

We also see that after one order is placed, the ingredient counter has 3 hits. This is logical because our burger contains three ingredients. Let’s find out which:
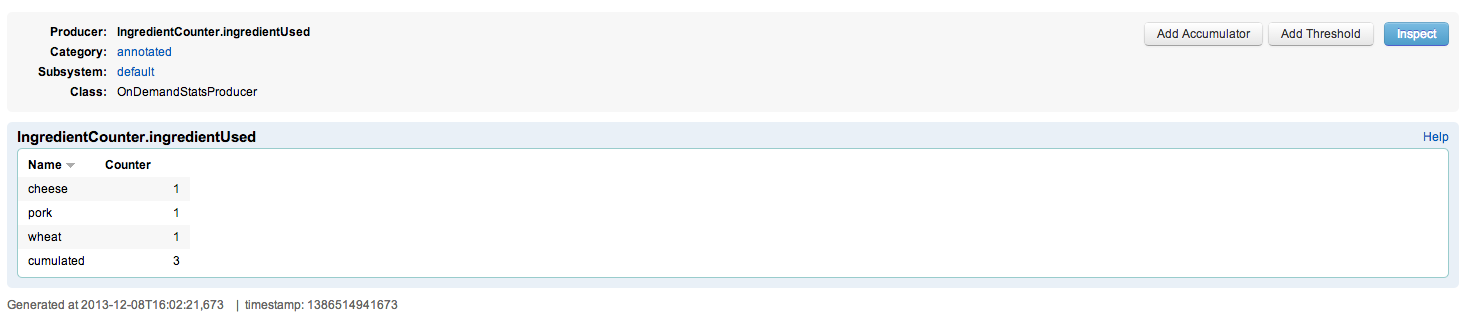
So, I apparently ordered a wheat bread burger with pork and extra cheese. Which is pretty regular, no cockroaches and other yummy stuff.
III. Creating Groups
Finally, let’s add some metadata to our Counters.
Since both of them are counting business values, let’s add them to a category business, where we can later find all business-related producers. To do so, we give an additional parameter to the @Count annotation.
@Count (category = "business", producerId = "orders")
public class OrderCounter {
As you’ve seen, we also gave a shorter name to the counter. @CountByParameter is a little different, because the method name is a mandatory part of the producer ID (at least for now), to separate multiple producers from each other. So let’s rename the counter and the method to achieve a more readable WebUI.
@CountByParameter(category = "business", producerId="ingredients")
public void used(String ingredient){
Now the WebUI has a business category, which is callable from outside per link (after we place another order): http://localhost:8080/burgershop/mui/mskShowProducersByCategory?pCategory=business

… and also the ingredient view looks easier:

Of course, you can also add Accumulators and Thresholds to Counters, thus being able to monitor those values over time.
That’s all for today. The next step will be about adding custom Stats that aren’t part of MoSKito’s out-of-the-box package.
Enjoy and see you soon!
The complete MoSKito integration guide – Step 3 – Custom producers | anotheria devblog
[…] ← Previous […]
iapilgrim
Great post.
I’m following it but can’t see the Counter in UI.
I’m using
OSX
Tomcat7053
Moskito 2.4.0 ( 2.4.3)
Thanks,
Van
Leon
Hello Van,
did you follow all the steps above, and did you actually performed an order?